GlyphViewer – Projects
Projects
Everything in GlyphViewer application is built around projects. A GlyphViewer project (.gvp extension file) is an XML file that contains all the loaded images to your project, as well as any added translations or recognized glyphs and words. Basically all your work that you perform using the application is stored in this local disk file.
All your data is stored in the gvp file, e.g. myproject.gvp. Make sure you do not delete this project. The file also have links to your local disk images, so make sure you do not delete them. The best way to do this is to actually keep the images in the same folder with your gvp file.
We will try to make a short tutorial on how you work with projects. The first thing you need to do after starting the application is to either open a project or to create a new one.
GlyphViewer comes with a DemoProject that you may use to test it’s features. It is automatically displayed in the Recent Project list in Welcome page upon application start.
New project
At any time you can create a new empty GlyphViewer project. This will always close any previous opened project. You can easily do this by clicking on the New Project… button on the Welcome page or through the menu options. A dialog will appear:
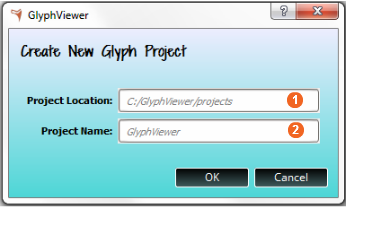 1 Project Location
By default the project will be situated in in install_dir/project. You can change the path at any time by either editing the text box or by clicking on the browse icon (blue folder icon in the textbox) to choose a different directory.
2 Project Name
The name of the project will be chosen to create the project_name.gvp file. This name will also be shown in the Recent Projects view in Welcome page.
Clicking OK will create a new empty project. You will then be able to add images to it. It should be a good idea to keep all the images in the same directory as the project, but it is not required.
Open project
You can always open any previous changed project. This can be done by either clicking on the Recent Projects on the Welcome page, or the Open Project… button, or through the Project menu options. A dialog will appear:
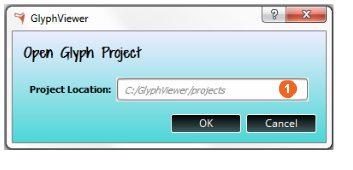
As you can see all that needs to be done is add the location of a GlyphViewer project. You can use the blue folder icon at 1 to actually browse for a *.gvp extension file to open.
Save project
One important aspect of using the aplication is that you should always save you changes to your project file. This can be done easily by clicking the Save Project menu option. Note*: this will overwrite you .gvp file so make sure you want to save your changes…
Images
You create projects so that you can open and add images to GlyphViewer. One project can hold one or more images, each image may contain any number of found glyphs, words or built translations. By default GlyphViewer supports jpg, tiff, png, bmp any many other image formats.
Once you created or opened a project you can add an image to the project by clicking Add Image menu option from Image. You can also use Current Project Images or Recent Images to open previously closed images from this project or a previously opened project.
Add Image
When you click on the Add Image menu option the following dialog will be shown:
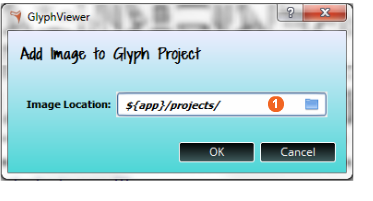
All that you need to do is enter a path to your image or use the blue folder icon to browse for your image.
Note*: currently png, jpg, tiff, bmp image are added to the filters. Other image format may also work (an error will be displayed after loading if image format is not supported). You can browse for different image formats by choosing a different filter in the browse dialog.
You can also add an image to your project using the Recent Images list from the Welcome page. Note*: clicking on the Current Project Images list will not add any more images to your project, it will just open an image already added to your project to your tab bar.
You can have the same image duplicated to your project and have different data (glyphs, translations etc) to each of them.
Remove Image
At any time you can remove an image from your project. All that you need to do is to select the image from the tab bar so that the image is shown in GlyphViewer and go to Image menu and click on the Remove Image option.
Removing an image from your project will cause all the data associated with the image (glyphs, words, translations…) to be deleted
You can also click on the close button right of the image name in the tab bar. Note*: this will not remove the image from you project, it will just close it from the tab bar. The image will appear again if you open the project. You can use the Current Project Images list from the Welcome page to re-add the image to the tab bar.