GlyphViewer – Exporting Content
At some point you might ask yourself why am I building multiple translations for text in images if I could just translate them into my own language. The reason is quite simple: “Don’t be selfish!”. We want to help you improve the online experience of your users!.
GlyphViewer was designed to allow non-technical people to build complex multilingual advertise slogans starting from campaign’s images. Serve native language slogans to people all around the world, link regions in your image to where users need to be directed. Thus, the targeted person will fully understand what the campaign is about without any additional language knowledge, besides the mother’s tongue.
To start exporting images and their data open a project (check out 2. Working with projects), then select the image you would like to export using the tab bar, go to Publish menu and select either Export As Image or Export As HTML:
Exporting images
GlyphViewer application can export your built content (glyphs, words, translations) in a multiple image formats such as jpg, png, bmp, ico and many more. Though this format is useful because you can basically upload it anywhere it is limited at only one language per image, or a selected language for each element (word, translation). Further information can be found in Export as image section.
Exporting SEO friendly HTML
This feature should probably the reason you may want to purchase GlyphViewer. Using this format you can export ALL of your translated data into a HTML format, SEO enabled, that can server the user native language translations if available. Upload it to your web server, or any other place that allows HTML data, and when a user from China visits your site, an Chinese translation of your text in the image will be shown. More information about SEO options can help can be found in Export SEO friendly HTML section.
Export as image
You can use this to export your image and it’s translation data as a static image format of your choosing. Clicking Export As Image… from the Publish menu will display the following dialog:
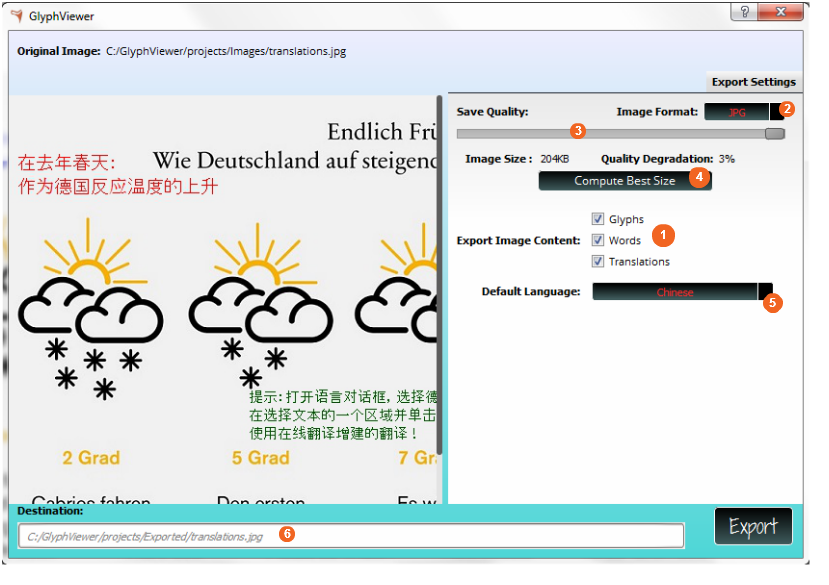
The original image path is shown in the dialog. All you need to do is fill in the required Export Settings, choose a destination path and click Export.
1. Image Data
You can choose which associated data to export from your image. The image’s data is either glyphs, words or translations. If you select a check box the specific image data will be added to the final image. For example if words are checked all words in the image will be shown on the exported image, as part of the final image (as if you’ve made a screenshot of the image seen in GlyphViewer). All exported data (glyphs, words, translations) will be at their current position in the image, as currently seen, with their font and color intact. For example if a glyph has a grey box around it due to a small confidence value (check 3. Building translations for more information) that grey box will also be shown in the resulting image.
2. Save Type
Here you can choose from a great number of available image formats to export. The destination will automatically be updated with the corresponding file extension of the chosen format.
3. Quality
The save quality will increase or decrease the disk size of the exported image. Of course, choosing a smaller quality value will decrease the image’s resolution. As you will slide the quality indicator you will notice on the left image preview, if format permits, an increase or decrease in the quality of the image. The preview on the left is equal to how the image will be shown if width and height are preserved (no scaling)
4. Best Size
A nice feature of GlyphViewer application is the ability to compute a best size of the image based on current width and height so that no more that 20% degradation is between the original image and the new size. This way you can automatically compute a size of the image where view quality is also kept.
5. Default Language
You can also choose what will be the language for your words and translations. This combo box will contain all of the translation languages associated with this image. For example if you choose English from the combo box all exported words and translations (if they are checked in 1.) will use English if available. You can use this combo box to generate static content for a specific language you desire. To add all available languages use the Export As HTML feature.
6. Destination
The last text box contains the destination and name of the exported image. As always you can use the blue icon folder to browse for the destination directory to use. The name of the exported image will be constructed from the original image’s name as shown in the Original Image: label adding the extension of the chosen save format.
By default the chosen directory to export your images is located in the [project_directory]/Export/ .
After you have exported your image the file will be created at the specified destination and the resulting image will also be opened in a new tab in the global tab bar.
Export SEO friendly HTML
Probably the most useful feature of the GlyphViewer application is the ability to export you translated data into a HTML page. This can be done by selecting the image you would like to export from the tab bar and choosing Export As HTML from the Image menu. A dialog will appear:
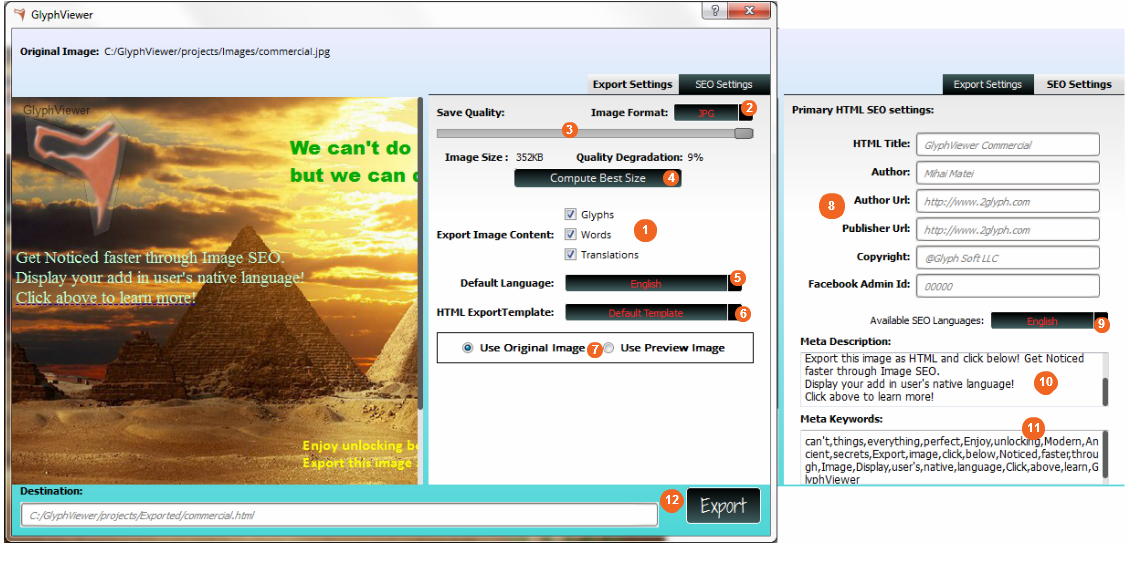
1. Image Data
You can choose which associated data to export from your image. The image’s data is either glyphs, words or translations. If you select a check box the specific image data will be added to the final image. For example if words are checked all words in the image will be shown on the exported image, as part of the final image (as if you’ve made a screenshot of the image seen in GlyphViewer). All exported data (glyphs, words, translations) will be at their current position in the image, as currently seen, with their font and color intact. For example if a glyph has a grey box around it due to a small confidence value (check 3. Building translations for more information) that grey box will also be shown in the resulting image. Note*: Unlike the Export As Image option selecting Glyph, Words or Translations from here will export ALL of those types to the HTML format in any language they can be found.
2. Save Type
The save type has any meaning only when Use Preview Image is selected, as you will use the new image saved in the format chosen. So if you like to change the format of the image used, click on Use Preview Image then change the save type option to the format desired. This is useful when you want to export a HTML format containing a JPG format starting from you original BMP image.
3. Quality
The save quality will increase or decrease the disk size of the exported image. Of course, choosing a smaller quality value will decrease the image’s resolution. As you will slide the quality indicator you will notice on the left image preview, if format permits, an increase or decrease in the quality of the image. The preview on the left is equal to how the image will be shown if width and height are preserved (no scaling). Note*: useful only when Use Preview Image is selected.
4. Best Size
A nice feature of GlyphViewer application is the ability to compute a best size of the image based on current width and height so that no more that 20% degradation is between the original image and the new size. This way you can automatically compute a size of the image where view quality is also kept. Note*: useful only when Use Preview Image is selected.
5. Default Language
You can also choose what will be the language for your words and translations. This combo box will contain all of the translation languages associated with this image and in case of the HTML format is useful to set which is the default language to show the HTML data in when user native language cannot be identified or no native translation exists. It is also used to set the default description and keywords html meta tags.
6. HTML ExportTemplate
GlyphViewer allows you to customize the exported HTML data by creating new HTML formats in templates directory of the installation. Just follow the sample CustomTemplate.html file found there and build your own HTML templates. All you need to do is add the file in templates directory and GlyphViewer will load it for you. Currently there is the Default Template and CustomTemplate.html to choose from.
7. Use Preview Image
GlyphViewer allows you to either use the original image in the exported HTML content, or to create a new image, base on the 2. Save Type, 3. Quality options that will be linked to the format. The new image, in case Use Preview Image is selected, will be placed in the same directory as the exported HTML destination at 12. For example if your original image was commercial.bmp, save type jpg and quality 50%, commercial.jpg with a quality of 50% will be create in projects/Exported directory and will be referenced by commercial.html exported file.
8. SEO Settings
Probably the most important settings in this format are found in the SEO Settings tab. The title, along with some html meta tags such as Author, Author Url, Copyright can be found here. Note*: by default they are filled with your account SEO settings in the About menu option. It’s probably best to keep this options the same for each image you export, with the exception of Title which should be filled (170 char maximum) to the current image title.
9. Available SEO languages
GlyphViewer to increase the SEO rating of the exported format will add description and keywords html meta tags for each of the translated language. This way search engines can see what the image contains in each of the available languages. Use the available languages from this combo box to check out the description and keywords for each language.
Why do we do this?
Imagine you have an image of a bread and have an English translation: bread and a French one: pain. The idea is that a user from French will search the word bread in it’s own language. A search engine will now see 2 meta descriptions for your image: bread and pain and will associate both of them to your image.
10. Meta Description
Holds per language data that will be added to the meta description tag built automatically by GlyphViewer from the available translations in that language in the image.
11. Meta Keywords
Holds per language data that will be added to the meta keywords tag built automatically by GlyphViewer from the available translations and words in that language in the image. Basically all the most important words in that language will be added here.
12. Export Destination
The last text box contains the destination and name of the exported HTML format. As always you can use the blue icon folder to browse for the destination directory to use. The name of the exported image will be contructed from the original image’s name as shown in the Original Image: label adding the HTML extension.
By default the chosen directory to export your images is located in the [project_directory]/Export/ .
After you have exported your image the file will be created at the specified destination and the resulting HTML format will also be opened in a new tab in the global tab bar.
Basically after ensuring that the SEO Settings are correct, checking whether to export glyph, words and/or translations and using the original or a new format of the image all you have to do is click Export. A new HTML format will be generated and displayed in a new tab.